Unveiling Geographic Trends: Crafting a Heat Map in Excel
Related Articles: Unveiling Geographic Trends: Crafting a Heat Map in Excel
Introduction
With great pleasure, we will explore the intriguing topic related to Unveiling Geographic Trends: Crafting a Heat Map in Excel. Let’s weave interesting information and offer fresh perspectives to the readers.
Table of Content
Unveiling Geographic Trends: Crafting a Heat Map in Excel
Visualizing data geographically is a powerful tool for gaining insights into spatial patterns and trends. Excel, despite its reputation as a spreadsheet application, offers a surprising capability to create geographic heat maps, enabling users to represent data visually on a map, highlighting areas of high and low concentration. This article explores the process of creating a heat map in Excel, outlining its benefits, and providing step-by-step instructions for a comprehensive understanding.
The Power of Geographic Visualization
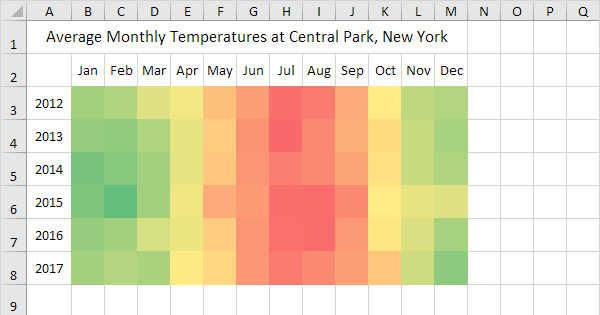
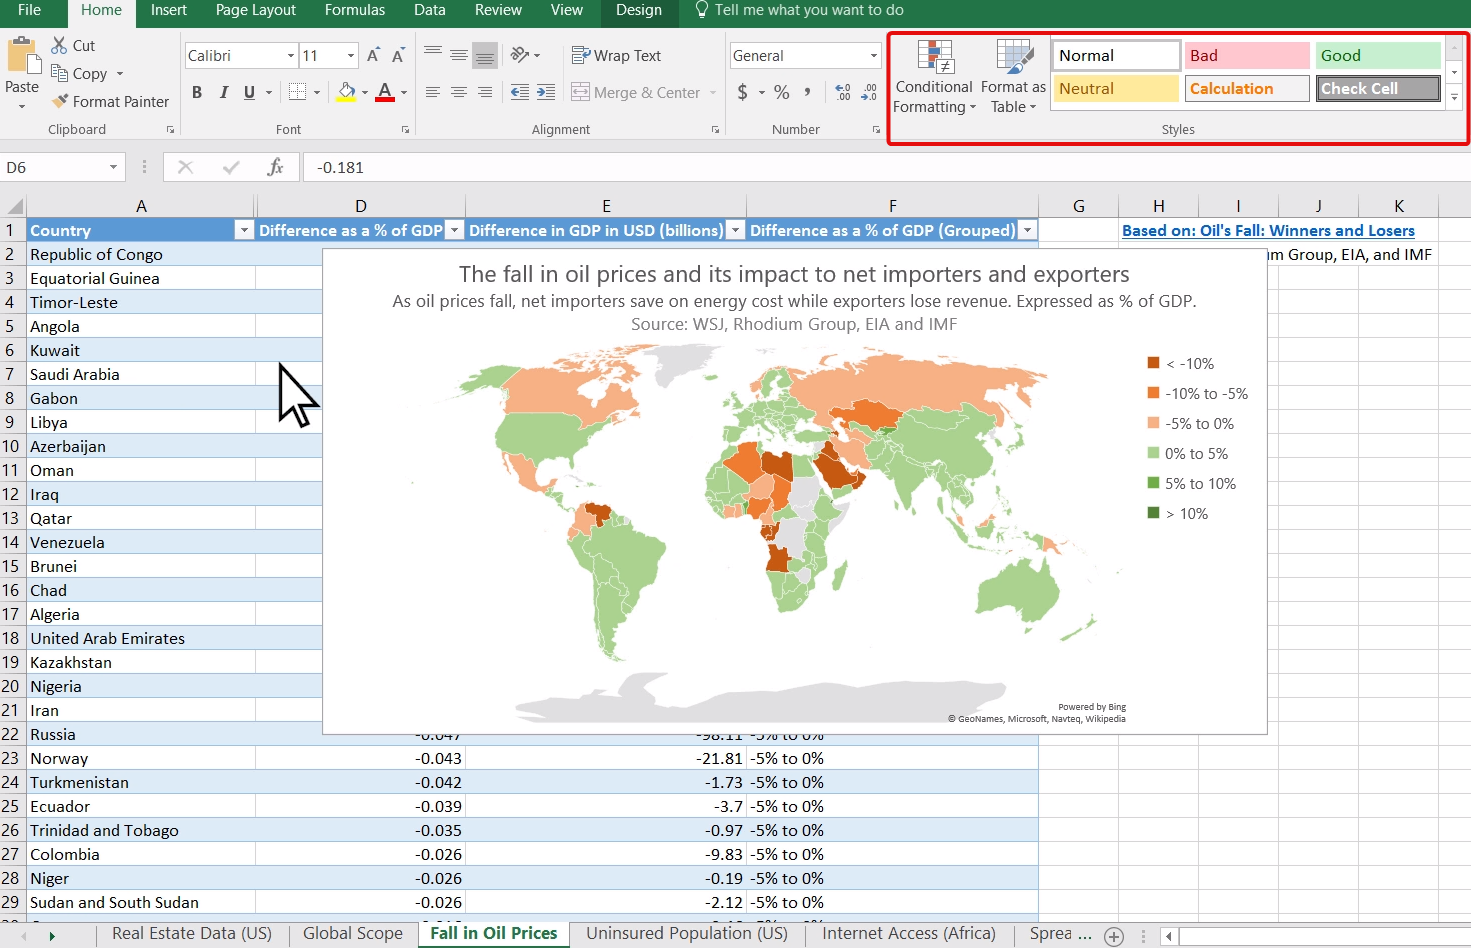
Geographic heat maps, also known as density maps, are visual representations of data points distributed across a geographical area. They employ a color gradient to depict the concentration of data points, with warmer colors indicating higher density and cooler colors signifying lower density. This visual representation facilitates the identification of clusters, outliers, and spatial patterns that may be difficult to discern from raw data alone.
Applications of Geographic Heat Maps
Geographic heat maps find applications across diverse fields, including:
- Business Analysis: Identifying customer concentration, sales performance, or market penetration across regions.
- Marketing: Targeting specific geographic areas based on customer demographics or campaign effectiveness.
- Healthcare: Analyzing disease outbreaks, hospital utilization, or healthcare resource distribution.
- Real Estate: Identifying areas with high property values, rental demand, or population density.
- Environmental Studies: Mapping pollution levels, deforestation patterns, or wildlife distribution.
- Social Sciences: Analyzing population density, migration patterns, or crime rates.
Creating a Geographic Heat Map in Excel: A Step-by-Step Guide
Excel’s built-in mapping capabilities, combined with the power of third-party add-ins, enable users to create compelling heat maps. This guide outlines the process using Excel’s built-in features, assuming a basic understanding of Excel functionalities.
1. Data Preparation
- Gather Geographic Data: The foundation of a heat map is accurate geographic data. This could include latitude and longitude coordinates, postal codes, or city names. Ensure the data is consistent and accurate for optimal visualization.
- Organize Data: Structure the data in a spreadsheet with columns for geographic identifiers (latitude/longitude, postal codes, or city names) and the data points you wish to visualize.
- Data Cleaning: Verify the data for any errors, inconsistencies, or missing values. Clean the data to ensure accuracy and prevent misleading visualizations.
2. Enabling Map Features
- Activate the Developer Tab: If the Developer tab is not visible, click "File" > "Options" > "Customize Ribbon." Check the "Developer" box and click "OK."
- Enable Map Controls: Click the "Developer" tab and select "Insert" > "Map Control." This will insert a map control into your worksheet.
- Adjust Map Size and Location: Resize and reposition the map control as desired.
3. Importing Geographic Data
- Select Data Range: Select the data range containing the geographic identifiers and data points you want to visualize.
- Insert Map Data: Click the "Map Control" and choose "Insert Data." Excel will automatically attempt to recognize and import the data into the map.
4. Creating the Heat Map
- Select Map Style: Click the "Map Control" and select "Map Styles." Explore various styles, colors, and themes to find the most appropriate visualization for your data.
- Adjust Color Gradient: Customize the color gradient to represent the data distribution effectively. Warmer colors typically represent higher concentrations, while cooler colors indicate lower concentrations.
- Add Labels and Legends: Include labels to identify geographic areas and a legend to explain the color gradient and its corresponding data values.
5. Refining the Visualization
- Adjust Map View: Use the zoom and pan controls to focus on specific areas of interest or adjust the map view to highlight key features.
- Add Data Markers: Use markers to represent individual data points on the map. This can provide further clarity and detail to the visualization.
- Customize Map Appearance: Adjust map elements such as borders, grid lines, and background colors to enhance the visual appeal and clarity of the map.
6. Exporting and Sharing
- Export as Image: Save the heat map as an image file (PNG, JPG, etc.) for easy sharing and integration into presentations or reports.
- Export as PDF: Create a PDF document containing the heat map for professional presentation and archival purposes.
Beyond Excel’s Built-in Features: Leveraging Add-ins
While Excel provides basic mapping functionalities, third-party add-ins offer advanced features and greater customization options for creating sophisticated heat maps. Some popular add-ins include:
- Power Map: A powerful visualization tool integrated with Excel, providing interactive 3D maps and heat map capabilities.
- Maptive: A web-based platform that integrates with Excel and allows users to create interactive maps and heat maps, offering a range of customization options.
- Geographic Data Visualization Tools: Various specialized geographic information system (GIS) software, such as ArcGIS and QGIS, offer advanced heat map creation capabilities, providing comprehensive data analysis and visualization tools.
FAQs: Addressing Common Questions
Q: What if my data doesn’t include latitude and longitude coordinates?
A: If your data contains postal codes or city names, you can use Excel’s "Geocode" function to convert them to latitude and longitude coordinates. This function requires an internet connection and access to a geocoding service.
Q: How can I adjust the color gradient to represent my data effectively?
A: Excel offers a range of color palettes and customization options for the color gradient. Experiment with different colors and gradients to find the most appropriate representation for your data. Consider using a diverging color palette (e.g., blue to red) to highlight both high and low values.
Q: Can I add additional layers or data points to my heat map?
A: Yes, you can add multiple layers to your heat map by using different data sets with varying color gradients. This allows you to visualize multiple data points simultaneously and identify relationships between different data sets.
Q: What are some tips for creating an effective heat map?
A:
- Use a clear and consistent color gradient: Avoid using too many colors or a confusing gradient.
- Ensure the map is visually appealing: Use a clean layout, appropriate fonts, and clear labels.
- Highlight key areas of interest: Focus on the most relevant data points and use markers to emphasize specific locations.
- Provide context and insights: Include a legend, labels, and a brief description of the data being visualized.
- Use a map projection appropriate for your data: Consider the geographic region and choose a projection that accurately represents the data.
Conclusion
Creating a geographic heat map in Excel empowers users to unlock insights from spatial data. By visually representing data on a map, users can identify trends, patterns, and anomalies that might otherwise be missed. Excel’s built-in mapping features, combined with the power of third-party add-ins, provide a versatile tool for creating compelling visualizations that can enhance decision-making and understanding across various fields. By mastering the process of creating heat maps in Excel, individuals can leverage the power of geographic visualization to gain a deeper understanding of their data and uncover hidden insights.
![Create a Geographic Heat Map in Excel [Guide] Maptive](https://www.maptive.com/wp-content/uploads/2020/12/excel-heat-maps-1.jpg)
![Create a Geographic Heat Map in Excel [Guide] Maptive](https://www.maptive.com/wp-content/uploads/2020/12/create-heat-map-with-excel.jpg)

Closure
Thus, we hope this article has provided valuable insights into Unveiling Geographic Trends: Crafting a Heat Map in Excel. We appreciate your attention to our article. See you in our next article!